Hi, all
I'd like to think that some of you have been missing me, so I've come on here to explain myself. I haven't suddenly given up crafting, but I've been quite ill and in and out of hospital the past few weeks.
I've had kidney stones, a ruptured ovarian cyst, E-coli, MRSA and urinary tract infections. Last week I had surgery to clear all the rubbish in my stomach, and though I'm home now, I really have no strength and I've been ordered to rest for at least another week. I thought it would be fun doing nothing, but at the moment I'm even too weak to read much.
I can't wait to get back to my craft room and as my new baby hairband buisness is launching on 3rd December I really hope I'm back to my old self again. I s till have quite a bit of work left to do for the launch so wish me luck.
My two married daughters have been amazing, helping me with the little 'uns and sending me stuff to cheer me up. The grandkids came to visit me in hospital and had great fun riding up and down on the bed, but everyone and most of all me is glad that I'm finally home and pain free.
Hope to be back very soon

Sunday, 18 November 2012
Monday, 15 October 2012
Out of my Comfort Zone
Over at UK Scrappers we are busy preparing for our cybercrop. A cybercrop or CC is exactly that. A group of scrapping fanatics get together over the WWW and have fun taking part in challenges,classes and learning new techniques. One of the precrop classes was a layout embracing white space. Now I'm really not good at leaving empty spaces on my pages so this class was a real challenge for me. I did the page though and it's not one of my favourites, but I'm glad that I did manage to get out of my comfort zone.
The original layout can be seen if you follow This Link and open the attatched PDF. Below is my take on it.
 I took DGD1 and DGD2 out for pizza during the summer and they had a lovely time. The original layout has suns where I put the pizza pies and a cloud where I used a cupcake.
 I cut the cupcake shape freehand. No I also didn't know I could draw a somewhat decent looking cupcake. I painted it with acrylics, outlined it in brown felt tip pen and addedd some gems and a button. The pizza pies are made from kraft cardstock also outlined in brown and felt tipped coloured dots for 'toppings'.
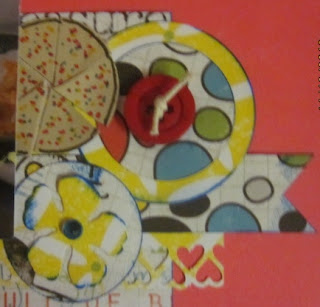 The circles and flower are die cut with my cuttlebug and finished with a button and a gem. As always thanks for coming.
The original layout can be seen if you follow This Link and open the attatched PDF. Below is my take on it.


Sunday, 30 September 2012
Wall hanging
Hi, this is a really quick post to show you a wall hanging I made. We have a festival, where we build little temporary homes, something like a shed, only nicer, and spend most of our time in there over the next seven days. We decorate these homes to make them beautiful and this is what I made
 I used a 12 x 12 chipboard and then divided it into twelve with chipboard strips. Lots of texture paste, Dylusions inks, Metal bits and Prima flowers went onto this project. Below you can see some close ups.


 As always I thank you for visiting my humble blog. Our holiday starts in half an hour, so I really must go. I'll be back in about 10 days


Sunday, 23 September 2012
An experiment and a challenge
Today's page started out as an experiment, and since said experiment worked out so brilliantly I decided to use my worthy efforts in a layout. I had the two perfect pictures to use in this page and it also perfectly suited the September sketch challenge over at Creative Craft World, which you cann find at:http://creativecraftworld.blogspot.co.uk/ so here goes:
 DGD1 sat herself on my stairs one day and proudly told me ''Look Bubby I'm in prison''. I couldn't resist snapping a photo or three of her. BTW, Bubby is Yiddish for Grandma, just in case you haven't cottoned on. I used the Lilac House collection by Fancy Pants for this LO. I've had it in my stash for quite a while, but never really found a use for it. It jumped out at me when I was deciding which papers to use. The colours match perfectly and the stripes blend in really well with the picture. trimmed the stripey pp to 9x9, distressed and inked the edges and then tore it in swveral places to give it a slightly shabby feel. The title for this was obvious given what Tzivi had said to me.
 These acetate flowers are the result of my experiment. It involves some acetate, a die cutting machine and dies, alcohol inks and a heat gun.
 First I diecut the acetate using my cuutlebug and the Spellbinders Rose Creations die. I had to run it through a few times and even then I still needed to use my scissors for some bits. Then I alcohol inked the blooms. I used a mixture of purples, blues and greens. Then the exciting experimental bit. Holding the petals with tweezers, I used my heat gun to curl them. You need to be really quick or they curl in on themselves or melt completely. While it is still hot you can manipulate the petals a bit, but I take no responsibility for burns so please be careful, and don't worry if the first couple are not perfect. I soon got the hang of it. I layered 2 or 3 at a time and used brads to secure them to my page. The little green berry branches are Petaloo. They were plain white, but I inked them up a bit.
 You could try using a candle.You probably have more control as it's not so hot and the petals will take slightly longer to curl
 I rubbed some lace with purple Stazon and stapled it on with my tiny attatcher. I sort of buried the lace under the torn bits.
 I turned up the bottom right hand corner of the pp to reveal the other side and I finished off the LO with some bling. Wish me luck for the challenge.


Thursday, 20 September 2012
Making waves
I've a new layout to show you all today. It is of my daughter showing off for me at the pool. We had a lovely few days away in August, and luckily for us we had good weather all the time so Sarah could make plenty use of the outdoor pool.
 For this layout I used the Barefoot and Bliss collection from Bo Bunny. I wanted to create a feeling of a lot of movement on the page, so I cut the pps into wavy strips. I then used my sew it all tool to make the wavy holes along the layout and stitched them in co ordinating colours. I also machine stitched with white thread at the borders of the strips of patterned paper. All the embellishments and the title are part of the same collection.
 Some close up details of the stitching. I drew some blue wavy lines as well and added a liitle blue stitching too.
 Above and below are some close ups of the layering and the embellishments.
 Sarah really was cool by the pool. Thanks for visiting me today. It's always appreciated.


Thursday, 13 September 2012
Band-it
I have a new occupation. My daughter and I are not willing to pay ridiculous prices for hair accessories, but both we and our daughters want the latest trends and fahions. So my genius of a daughter came up with the idea that her extremely talented mum can make them herself at a fraction of the cost. And of course if said mum - that's yours truly- buys all the bits and pieces needed it won't cost the family clever clogs anything. Always willing to have a go at new stuff, I said why not, and these are what I came up with.
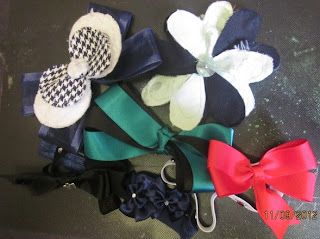 A mixture of baby hair bands and hair clips for little -and not so little - madams
 This one is a hair clip for DGDs 1 and 2. Of course when Mummy makes the accessories they can match perfectly to the clothes. I put the turquoise and black ribbons together and treated them as one when making this bow.
 This hairband belongs to DGD3. You can buy every colour of elastic imaginable on Ebay. The bows on this are bought, and my bling box came in very useful as well

 Another one for little madam number 3. This is a simple double looped bow and some more gems
 And yet another baby one. Here I made two loops one slightly smaller than the other. I laid little over large and finished with a little sparkle flower and - you got it - bling!

 The two you see here are for not so little madam, my precious daughter Sarah. These are actually made from the same fabric a the outfits that I sewed. Maybe I'll get round to putting up some pics tomorrow. The one below is actually navy blue and mint green but the lighting was awful when I took the photo.

 And here is my beautiful granddaughter making a lovely model. Isn't she a cutie? So I've decided as I'm so good at this, maybe I can sell them and actually make some money from at least one of my hobbies. I've even thought of a name for my buisness. BAND-IT, the title of my post today. So all I need to do now is actually put my money where my mouth is, literally
 Thanks for popping along today and as always I do appreciate all your lovely comments


Tuesday, 4 September 2012
Another card
Today is Sarah's birthday and here is the card I made for her. I am entering it into Creative Craft World's mini challenge.
 I used Bo Bunny's lush Garden Girl collection for this card. I'm really getting much better at chopping up my patterned papers for smaller projects than 12 x 12. The base is Bazzil, the lace is from Webster's pages and the baker's twine is MME. The sentiment is some very old mini alphas.
 The bunch of flowers is cut from one of the PPs and adhered with foam squares to lift it off the page. I also double cut some of the blooms and stuck them on top of one another for added dimension. It's not very clear in the photo, but looks really effective IRL. I added some little gems to the blooms and banner for extra girly sparkle and Sarah really loves it. Below you can see detail of the mini banner
 Thanks for popping along to my blog today, and your lovely comments are always appreciated.


Subscribe to:
Comments (Atom)