September is a really busy month here. We have 8 birthdays to celebrate. Here I'm starting with My DS2's card.
I used the gorgeous Craftsman collection from Prima for the card. The base is bazzil. I wanted the card to look quite grungy, so I did alot of distressing inking and tearing for it. I tucked some lace cut from Webster's pages vintage tulle under some of the tears, and I stitched around the cog cutouts and also did some stitching around the notecard. I layered some stickers and trinckets and added some Tim Holtz chains to the cogs. I also placed a cog pin at th top corner of the card. The title is Hebrew for congratulations.
Some close ups of the stitching and chains
A little bit of lace
Stickers, trinkets and sentiments. The title and some more stitching
Thanks for calling, and I always appreciate your lovely comments
Sunday, 2 September 2012
Thursday, 30 August 2012
A card a layout and a mini
Yes I know my blog's been sadly neglected lately. I'm going through a bit of a rough time with my health recently, and haven't really had the energy. I have some kind of unidentified lung condition which has me coughing all over the place and leaves me gasping for air so badly that I need oxygen to help me breathe. I won't bore you with the details, but I do hope the good docs find out what my problem is soon.
In the meantime I've managed a LO and a birthday card for DGD 1 who's turning 4 tomorrow. I can hardly believe I am a grandmother of a 4 year old. I've also started a mini featuring the party our family held over the Jubilee weekend.
Firstly here is my LO. The picture is of Sarah with her really good friend. The layout really came about because I was experimenting with a flower idea I thought of. I made the flower and it turned out so beautiful that I thought it was too good to waste and turned the whole thing into this LO
.
Each layer of the flower is made by cutting out 5 hearts and snipping the bottom point into a shape. I then glued the V together and glued each heart to the other with strong glue. I overlapped each heart slightly and the hearts needed a bit of manipulation to get the shape I wanted. I used two different sized hearts for the layers. I drew them freehand but you could use a punch or die if you prefer. I then used puffy paint on the edges and when I had puffed up the paint and it was dry I added some stickles to the edges and the body of the flower. I glued the two layers and finished it with a Prima flower centre. I hope you understand these instructions in case you want to give it a try
I used the Martha Stewart lacy hearts border punch for my strips of PP and then used ribbon to lace through the holes. I also kept the tiny hearts that came away from the punch and glued them randomly over the LO
A close up of the little heart fall outs. I also used puffy paint and stickles on the edges of my photo matte.
First I took a 5 x 10 inch piece of CS and folded it in half. I covered the outside and the inside lower half with PP
Afterwards I chose this delicious little decoupage image as decoration. I stuck the whole image to a 4 1/2 by 51/2 piece of pp covered cs. I folded the top layer of the card in half and stuck the embellishment to the bottom half.
Some handmade spiral roses hold the mountain folded part of the card in place if you see what I'm getting at.
Lastly, I've been working on a mini album of our Jubilee party. The actual book is finished, but I have yet to fill it with pictures and decorations. Hopefull I'll get it done over the weekend, but in the meantime here is what I've done so far.
This is the front cover. The album was inspired by one made by the amazingly talented Laura Denison. Check out all her really cool stuff on thepapertrail.blogspot.com. You will betruly flabbergasted by the stuff that Laura can do. I used the Portobello Road collection by Papermania. This collection is fantastic. It has everything you'll ever need for anything British, and no I don't work for them. The crown is cut from a sizzix die and I'm still going to add the number 60 from Tim Holtz numerals on the bottom corner .
This is an approximate view of the inside. Each page has several pockets and tags for photos, journalling or ephemera.
This is a close up view of one side of each page
And here is one from the other side. Hopefully soon I'll be able to show you the finished product. In the meantime thanks for stopping by and I always appreciate any comments.
In the meantime I've managed a LO and a birthday card for DGD 1 who's turning 4 tomorrow. I can hardly believe I am a grandmother of a 4 year old. I've also started a mini featuring the party our family held over the Jubilee weekend.
Firstly here is my LO. The picture is of Sarah with her really good friend. The layout really came about because I was experimenting with a flower idea I thought of. I made the flower and it turned out so beautiful that I thought it was too good to waste and turned the whole thing into this LO
.
Each layer of the flower is made by cutting out 5 hearts and snipping the bottom point into a shape. I then glued the V together and glued each heart to the other with strong glue. I overlapped each heart slightly and the hearts needed a bit of manipulation to get the shape I wanted. I used two different sized hearts for the layers. I drew them freehand but you could use a punch or die if you prefer. I then used puffy paint on the edges and when I had puffed up the paint and it was dry I added some stickles to the edges and the body of the flower. I glued the two layers and finished it with a Prima flower centre. I hope you understand these instructions in case you want to give it a try
I used the Martha Stewart lacy hearts border punch for my strips of PP and then used ribbon to lace through the holes. I also kept the tiny hearts that came away from the punch and glued them randomly over the LO
A close up of the little heart fall outs. I also used puffy paint and stickles on the edges of my photo matte.
Next up is the card I made for my granddaughter.
Afterwards I chose this delicious little decoupage image as decoration. I stuck the whole image to a 4 1/2 by 51/2 piece of pp covered cs. I folded the top layer of the card in half and stuck the embellishment to the bottom half.
Lastly, I've been working on a mini album of our Jubilee party. The actual book is finished, but I have yet to fill it with pictures and decorations. Hopefull I'll get it done over the weekend, but in the meantime here is what I've done so far.
This is the front cover. The album was inspired by one made by the amazingly talented Laura Denison. Check out all her really cool stuff on thepapertrail.blogspot.com. You will betruly flabbergasted by the stuff that Laura can do. I used the Portobello Road collection by Papermania. This collection is fantastic. It has everything you'll ever need for anything British, and no I don't work for them. The crown is cut from a sizzix die and I'm still going to add the number 60 from Tim Holtz numerals on the bottom corner .
This is an approximate view of the inside. Each page has several pockets and tags for photos, journalling or ephemera.
This is a close up view of one side of each page
And here is one from the other side. Hopefully soon I'll be able to show you the finished product. In the meantime thanks for stopping by and I always appreciate any comments.
Wednesday, 1 August 2012
Lay it out
I've had a productive few days, and have 4 layouts for you today. The first one is of DGD2 AKA Estie. She never stays still long enough to get a decent pose, so I decided to scrap her in her silly positions.
As you can see, she never stops moving. This layout didn't really come out anyhing like I imagined it. With so many pictures I toyed with the idea of a double layout, but I don't really go for those, so I did this instead. The background is pale pink cs, and the pp is from thebasic grey little black dress collection as are the chipboard embellies. The gems are Prima flower centres and the trim is Websters Pages. I drew some faux stitching around the pictures, pps and embellishments. I added a stamped bloom in each corner and some pink bling to finish.
The Alphas are American Craft DIY Thickers. I glittered them and added some more pink bling
A close up of the chipboard above and the stamp below.
This next layout is of Sarah. She's kneeling on the wall in my garden. I used Websters Pages Girl Land for this LO. I cut the pp around a shaped cardstock and then cut out the middle to make a frame, The picture is matted and then I used some of the trim to frame the matte.
The blooms are a mix of Prima and Petaloo, white flowers which I inked and misted to achieve my desired shade. The leaves are also Prima.
I added some bling to the centre of my blooms to give them some sparkle
These little knots were made from tiny remnants of ribbon that I could never bring myself to throw out, and I finally found a use for them
These little butterfly buttons and the green crochet brads seen above are from the Bo Bunny Little Miss collection. I absolutely adore Bo Bunny and have almost all of their coleections. I really need to scrap loads to justify all those purchases.
The layout above shows Sarah and Lazer feeling on top of the world. I used the Bo Bunny weekend market collection. I wonder who comes up with all the names for the collections. I mean why Weekend Market? Anyway, I digress. I cut the world shape from one of the pp's and added some blue trim from my ribbon collection. Some noteworthy, dimensional stickers, trinkets and more bling finish off this one. The inking on the background cardstock is not ink at all, but chocolate which someone who shall remain nameless dripped onto my work when they knew full well that eating is forbidden in the craft room. Good job the brown blended in, so a bit of spray mist and a paper towel made this look deliberate.
This last layout which I have for you today is of my DGD1 AKA Tzivi. Contrary to her little sister, Tzivi loves posin for the camera. Here she is lying in the very messy grass in my back garden.
I used the Butterfly Garden collection from Pink Paislee. I kept this LO very simple as I wanted the focus on the flowers and leaves. They were created using the Rose Creations die from Spellbinders. I shaped the flowers and leaves with a ball tool thingy whose proper name I don't know, added some stamens and bling. I know I'm very into bling at the moment. Gems seem to go on all my projects lately. I left the chipboard butterfly bare, but added some diamond stickles to it as well as to my blooms and leaves. The title is American Craft Thickers. Thanks so much for joining me again and I hope to be back in a few days.
As you can see, she never stops moving. This layout didn't really come out anyhing like I imagined it. With so many pictures I toyed with the idea of a double layout, but I don't really go for those, so I did this instead. The background is pale pink cs, and the pp is from thebasic grey little black dress collection as are the chipboard embellies. The gems are Prima flower centres and the trim is Websters Pages. I drew some faux stitching around the pictures, pps and embellishments. I added a stamped bloom in each corner and some pink bling to finish.
The Alphas are American Craft DIY Thickers. I glittered them and added some more pink bling
A close up of the chipboard above and the stamp below.
This next layout is of Sarah. She's kneeling on the wall in my garden. I used Websters Pages Girl Land for this LO. I cut the pp around a shaped cardstock and then cut out the middle to make a frame, The picture is matted and then I used some of the trim to frame the matte.
The blooms are a mix of Prima and Petaloo, white flowers which I inked and misted to achieve my desired shade. The leaves are also Prima.
I added some bling to the centre of my blooms to give them some sparkle
These little knots were made from tiny remnants of ribbon that I could never bring myself to throw out, and I finally found a use for them
These little butterfly buttons and the green crochet brads seen above are from the Bo Bunny Little Miss collection. I absolutely adore Bo Bunny and have almost all of their coleections. I really need to scrap loads to justify all those purchases.
The layout above shows Sarah and Lazer feeling on top of the world. I used the Bo Bunny weekend market collection. I wonder who comes up with all the names for the collections. I mean why Weekend Market? Anyway, I digress. I cut the world shape from one of the pp's and added some blue trim from my ribbon collection. Some noteworthy, dimensional stickers, trinkets and more bling finish off this one. The inking on the background cardstock is not ink at all, but chocolate which someone who shall remain nameless dripped onto my work when they knew full well that eating is forbidden in the craft room. Good job the brown blended in, so a bit of spray mist and a paper towel made this look deliberate.
This last layout which I have for you today is of my DGD1 AKA Tzivi. Contrary to her little sister, Tzivi loves posin for the camera. Here she is lying in the very messy grass in my back garden.
I used the Butterfly Garden collection from Pink Paislee. I kept this LO very simple as I wanted the focus on the flowers and leaves. They were created using the Rose Creations die from Spellbinders. I shaped the flowers and leaves with a ball tool thingy whose proper name I don't know, added some stamens and bling. I know I'm very into bling at the moment. Gems seem to go on all my projects lately. I left the chipboard butterfly bare, but added some diamond stickles to it as well as to my blooms and leaves. The title is American Craft Thickers. Thanks so much for joining me again and I hope to be back in a few days.
Tuesday, 24 July 2012
Teachers's gift
The weather's glorious, summer's finally arrived and that reminded me that it's teacher's gift time of year again. The children break up on Thursday so I had to get busy.
I wanted to make something really pretty but not too time consuming, and I came up with a little honeycomb booklet, the idea of which I lifted from one of my nnumerous books. Of course it ended up taking far longer than the hour I envisaged, and my craft room is every colour of the rainbow now, but I'm pleased with the result.
This is the front cover. It's chipboard covered in paper. I used th Old School collection from Pink Paislee. The blackboard is from 7 gypsies and came on a stick which I cut off. I used white paint and a skewer to write the message, so it should look like chalk
To make the honeycomb effect, I accordian folded two pieces of paper, cut through the middle of them to the halfway point and wove them into each other. I then folded the finished piece flat, sort of like squashing a drinks carton, and, stuck the ends to the front and back covers. I created 3 tags to insert into the spaces.
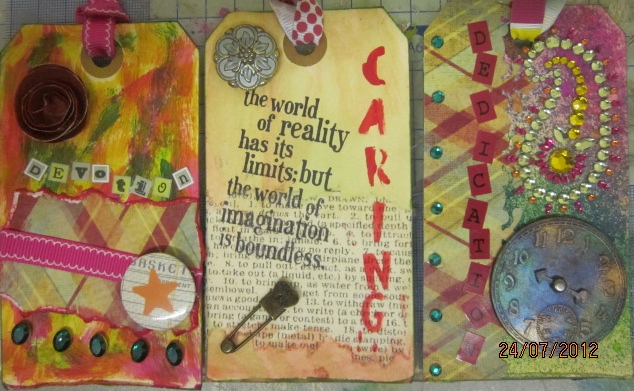
The first tag is misted with Dylusions spray ink in a variety of colours. I made a punched paper border down the left ide. A Tim Holtz timepice jazzed up with perfect pearls and some bling finish off this tag.
This tag is distress inked. I spritzed the ink with my mini mister to blend it well. The tissue paper is Tim Holtz journal tissue and the button, stamp and pin are from Sir Tim too. I really do love his stuff. The wording is done with an alpha stencil and acrylic paint
This last tag is painted with a mix of Dylusionsacrylic paint. I really enjoyed doing that. I felt like a little kid. I wrapped some wribbon around a torn paper mat, added a button, flower and some bling and Voila! another finished tag.
This is the finished article......
........and here are the 3 tags next to each other.
I wanted to make something really pretty but not too time consuming, and I came up with a little honeycomb booklet, the idea of which I lifted from one of my nnumerous books. Of course it ended up taking far longer than the hour I envisaged, and my craft room is every colour of the rainbow now, but I'm pleased with the result.
This is the front cover. It's chipboard covered in paper. I used th Old School collection from Pink Paislee. The blackboard is from 7 gypsies and came on a stick which I cut off. I used white paint and a skewer to write the message, so it should look like chalk
To make the honeycomb effect, I accordian folded two pieces of paper, cut through the middle of them to the halfway point and wove them into each other. I then folded the finished piece flat, sort of like squashing a drinks carton, and, stuck the ends to the front and back covers. I created 3 tags to insert into the spaces.
The first tag is misted with Dylusions spray ink in a variety of colours. I made a punched paper border down the left ide. A Tim Holtz timepice jazzed up with perfect pearls and some bling finish off this tag.
This tag is distress inked. I spritzed the ink with my mini mister to blend it well. The tissue paper is Tim Holtz journal tissue and the button, stamp and pin are from Sir Tim too. I really do love his stuff. The wording is done with an alpha stencil and acrylic paint
This last tag is painted with a mix of Dylusionsacrylic paint. I really enjoyed doing that. I felt like a little kid. I wrapped some wribbon around a torn paper mat, added a button, flower and some bling and Voila! another finished tag.
This is the finished article......
Monday, 16 July 2012
Picture perfect
Hi everyone. I've been playing with my new camera. Yesterday for a change, the children and grandchildren wer being co operative, so I managed to snap some pretty good shots. I can't wait to print them and scrap some of them.
These three are, Sarah and Lazer, not fighting for a change. As you can see the weather is really gloomy, but they were in such good moods I couldn't miss the opportunity.
Here is Sarah with her friend.
Sarah and Lazer are feeling on top of the world
These three are, Sarah and Lazer, not fighting for a change. As you can see the weather is really gloomy, but they were in such good moods I couldn't miss the opportunity.
Here is Sarah with her friend.
Sarah and Lazer are feeling on top of the world
These are a selection of Tzivi, Estie and Miri. I think they're the cutest granddaughters in the world, but of course I'm biased. Tzivi is a right madam and loves posing, but with Esti it's a different story. She doesn't have time to stay still long enough for a decent pose, but like I said they were all really co operative so I did get a couple. Evwn Miri allowed me to put her in a bunch of crazy poses and I got some pretty good shots of all three of them. Thanks for looking and see you again soon.
Wednesday, 27 June 2012
Finally something to show you
Hello bloggers and thanks for your patience. My life has settled down to some semblance of normal and today I have 2 new Layouts to show you.
The first one is of my brother with my DD1. The picture is 23 years ago. My DD now has three children of her own and my brother is married with 4 little 'uns and is acutely embarrassed by the way he looks on the picture, but I really like it.
I used Kraft cardstock for the background and splodged some paint on it. I'm getting to grips with my messy side and am finding it very therapeutic. The rest of the pps are from the Bo Bunny, Welcome Home collection. I fussy cut the fence and flourish, made some swirly roses and created a banner for the title. The alphas are ancient ones from the bottom of my alphas book and they provide a great finishing touch
DEtails of the fence. This took me ages but is well worth it. I adhered it with foam squares to give it dimension.
The roses are made by cutting circles of paper into spirals, twirling them and then sort of bending and squashing them. I finished each one with a gem in the centre
Details of the title banner and alphas. You can also catch a glimpse of the paint splats.
This next LO is of two of my favourite subjects, namely DGD1 and DGD2. I took this spontaneous shot just as they wer hugging each other and love the way it came out.
I made this LO using the Little Black Dress collection from Basic Grey. I love this collection. It's so classic and can be used in many different ways. I also made use of one of my numerous pizza boxes. I stripped it down to the corrugation, tore it up a bit and used some acrylic paint dabbers in black and cream on it. The dabbers do have fancy name colours, but I only remember the generic names. I machine stitched round the outside edge of my background paper and also around the photo matte and the actual photo. I added some blooms, lace, a netting bow and rubons. The gem centres are from Kaiser craft. Finally the title which reads 'Sister Act' is done on a journalling spot with teeny tiny alphas.
These blooms are done using the new cut fold tuck dies from spellbinders. They are amazing. I only have one set so far but plan on treating myself to some more in the future.
The rubon is Basic Grey again and I put some little gems on for effect.
The bow is done with Webster's antique netting tied with some black ribbon, and the lace is I can't remember what from my stash.
That's all for now. Thanks for visiting and I love reading all your comments too.
The first one is of my brother with my DD1. The picture is 23 years ago. My DD now has three children of her own and my brother is married with 4 little 'uns and is acutely embarrassed by the way he looks on the picture, but I really like it.
I used Kraft cardstock for the background and splodged some paint on it. I'm getting to grips with my messy side and am finding it very therapeutic. The rest of the pps are from the Bo Bunny, Welcome Home collection. I fussy cut the fence and flourish, made some swirly roses and created a banner for the title. The alphas are ancient ones from the bottom of my alphas book and they provide a great finishing touch
DEtails of the fence. This took me ages but is well worth it. I adhered it with foam squares to give it dimension.
The roses are made by cutting circles of paper into spirals, twirling them and then sort of bending and squashing them. I finished each one with a gem in the centre
Details of the title banner and alphas. You can also catch a glimpse of the paint splats.
This next LO is of two of my favourite subjects, namely DGD1 and DGD2. I took this spontaneous shot just as they wer hugging each other and love the way it came out.
I made this LO using the Little Black Dress collection from Basic Grey. I love this collection. It's so classic and can be used in many different ways. I also made use of one of my numerous pizza boxes. I stripped it down to the corrugation, tore it up a bit and used some acrylic paint dabbers in black and cream on it. The dabbers do have fancy name colours, but I only remember the generic names. I machine stitched round the outside edge of my background paper and also around the photo matte and the actual photo. I added some blooms, lace, a netting bow and rubons. The gem centres are from Kaiser craft. Finally the title which reads 'Sister Act' is done on a journalling spot with teeny tiny alphas.
These blooms are done using the new cut fold tuck dies from spellbinders. They are amazing. I only have one set so far but plan on treating myself to some more in the future.
The rubon is Basic Grey again and I put some little gems on for effect.
The bow is done with Webster's antique netting tied with some black ribbon, and the lace is I can't remember what from my stash.
That's all for now. Thanks for visiting and I love reading all your comments too.
Subscribe to:
Posts (Atom)