Tuesday, 24 July 2012

Teachers's gift

The weather's glorious, summer's finally arrived and that reminded me that it's teacher's gift time of  year again. The children break up on Thursday so I had to get busy.
I wanted to make something really pretty but not too time consuming, and I came up with a little honeycomb booklet, the idea of which I lifted from one of my nnumerous books. Of course it ended up taking far longer than the hour I envisaged, and my craft room is every colour of the rainbow now, but I'm pleased with the result.

 This is the front cover. It's chipboard covered in paper. I used th Old School collection from Pink Paislee. The blackboard is from 7 gypsies and came on a stick which I cut off. I used white paint and a skewer to write the message, so it should look like chalk

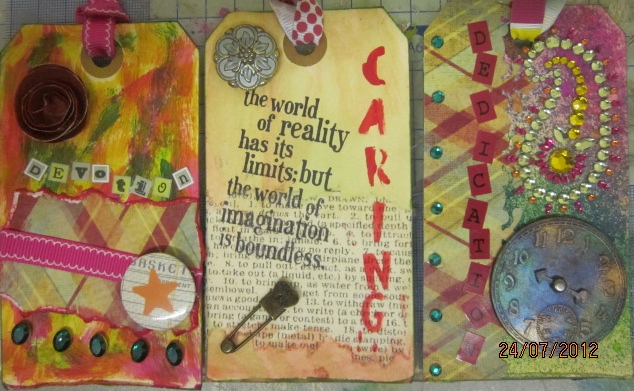
To make the honeycomb effect, I accordian folded two pieces of paper, cut through the middle of them to the halfway point and wove them into each other. I then folded the finished piece flat, sort of like squashing a drinks carton, and, stuck the ends to the front and back covers. I created 3 tags to insert into the spaces.
 The first tag is misted with Dylusions spray ink in a variety of colours. I made a punched paper border down the left ide. A Tim Holtz timepice jazzed up with perfect pearls and some bling finish off this tag.
 This tag is distress inked. I spritzed the ink with my mini mister to blend it well. The tissue paper is Tim Holtz journal tissue and the button, stamp and pin are from Sir Tim too. I really do love his stuff. The wording is done with an alpha stencil and acrylic paint
 This last tag is painted with a mix of Dylusionsacrylic paint. I really enjoyed doing that. I felt like a little kid. I wrapped some wribbon around a torn paper mat, added a button, flower and some bling and Voila! another finished tag.

 This is the finished article......


........and here are the 3 tags next to each other.

Monday, 16 July 2012

Picture perfect

Hi everyone. I've been playing with my new camera. Yesterday for a change, the children and grandchildren wer being co operative, so I managed to snap some pretty good shots. I can't wait to print them and scrap some of them.


 These three are, Sarah and Lazer, not fighting for a change. As you can see the weather is really gloomy, but they were in such good moods I couldn't miss the opportunity.

 Here is Sarah with her friend.

Sarah and Lazer are feeling on top of the world


These are a selection of Tzivi, Estie and Miri. I think they're the cutest granddaughters in the world, but of course I'm biased. Tzivi is a right madam and loves posing, but with Esti it's a different story. She doesn't have time to stay still long enough for a decent pose, but like I said they were all really co operative so I did get a couple. Evwn Miri allowed me to put her in a bunch of crazy poses and I got some pretty good shots of all three of them. Thanks for looking and see you again soon.

Wednesday, 27 June 2012

Finally something to show you

Hello bloggers and thanks for your patience. My life has settled down to some semblance of normal and today I have 2 new Layouts to show you.

The first one is of my brother with my DD1. The picture is 23 years ago. My DD now has three children of her own and my brother is  married with 4 little 'uns and is acutely embarrassed by the way he looks on the picture, but I really like it.

 I used Kraft cardstock for the background and splodged some paint on it. I'm getting to grips with my messy side and am finding it very therapeutic. The rest of the pps are from the Bo Bunny, Welcome Home collection. I fussy cut the fence and flourish, made some swirly roses and created a banner for the title. The alphas are ancient ones from the bottom of my alphas book and they provide a great finishing touch
 DEtails of the fence. This took me ages but is well worth it. I adhered it with foam squares to give it dimension.
 The roses are made by cutting circles of paper into spirals, twirling them and then sort of bending and squashing them. I finished each one with a gem in the centre
Details of the title banner and alphas. You can also catch a glimpse of the paint splats.


This next LO is of two of my favourite subjects, namely DGD1 and DGD2. I took this spontaneous shot just as they wer hugging each other and love the way it came out.

 I made this LO using the Little Black Dress collection from Basic Grey. I love this collection. It's so classic and can be used in many different ways. I also made use of one of my numerous pizza boxes. I stripped it down to the corrugation, tore it up a bit and used some acrylic paint dabbers in black and cream on it. The dabbers do have fancy name colours, but I only remember the generic names. I machine stitched round the outside edge of my background paper and also around the photo matte and the actual photo. I added some blooms, lace, a netting bow and rubons. The gem centres are from Kaiser craft. Finally the title which reads 'Sister Act' is done on a journalling spot with teeny tiny alphas.
 These blooms are done using the new cut fold tuck dies from spellbinders. They are amazing. I only have one set so far but plan on treating myself to some more in the future.
 The rubon is Basic Grey again and I put some little gems on for effect.
The bow is done with Webster's antique netting tied with some black ribbon, and the lace is I can't remember what from my stash.

That's all for now. Thanks for visiting and I love reading all your comments too.

Tuesday, 29 May 2012

Hello again

Hi everybody. I know I've been AWOL for a couple of months, but I've been to hell and back in my personal life and blogging was not even ON my list of priorities. So I apologise for that and am hoping to get crafting and sewing again now that I'm back to normal - whatever that is.
I'm not going to go into personal details, but I'm now a single Mum and though it's really hard work, I'm really happy now, so it was worth going through a horrible few weeks even though I thought I wouldn't survive it. My friends really rallied round and gave me the support and help to know that I did the right thing. That's all for now. See you soon

Wednesday, 28 March 2012

Playing tag

Hi there. Over on UKscrappers, I've been doing a fabric tag swap. we had to make 6 tags where the main ingredient was fabric. They could be enhanced with other stuff, but the majority had to be fabric based. Here's my effort.
 My base is burgundy felt and so is the backing. I added some pale pink felt and a touch of pink print fabric to the base. The flower is cut from the same burgundy and pink felt using the new Tim Holtz flower garland strip die and my lovely cuttlebug. I had to run the felt through the machine about six times to get a clean cut, but the end result was worth it. I sewed the pale pink onto the burgundy with green variegated embroidery thread and the pink print is appliqued on top with orange thread. I sewed the base and the backing together using the same green variegated thread. The watering can and butterfly are inked and glimmer misted chipboard, and I distress inked the lace which I then sewed on using teeny tiny stitches. Above the lace I added some burgundy loopy ribbon and the flower on the lace is an alcohol inked button, with a little green gem on it. I also added some gems to the lace and an alcohole inked crystal drop also compliments of Tim Holtz. A little silver charm and some stickles grass and a bird finish off the tag. I really enjoyed doing this swap and can't wait to see what the other swapees come up with. Below are some close ups of the detail.
 The flower is made up of layers of alternate coloured felt with a green dewdrop stuck in the centre.
 The crystal drop is alcohol inked with a gem stuck on for effect. The chipboard butterfly is inked and glimmer misted, and I added some stickles to jazz it up a bit
Here you can see the lace, ribbon, little button flower and stickles ''grass''. Thnks for stopping by and see you again soon.

Monday, 19 March 2012

Welcome Miri

Hello there bloggers. I'm catching some blog time, before rushing off to an appointment with my son. Sheya is diabetic and even at 19 he still likes me to come with him to his hospital appointments. Never mind, it gives me a chance to snooze on the bus. I am flippin' exhaustem. My granddaughters are adorably cute, but I've forgotten how hard it is to look after a couple of toddlers.
Anyway, back to the point. The newcomer to our family was named on Saturday. Her name is Miriam, but we're calling her Miri. She's too little for such a mouthful.
In between running after toddlers, doing Passover cleaning and sewing for everyone, also fo Passover, I managed to squeeze in a quick layout of ittle Miri. Here's a peek.

I used white cardstock as a base, and cut a frame from pink cardstock. The stripey paper is from my stash which I am trying to use up, as is the ruler paper. The blooms are Prima and the rest of the embellishments are from the My Minds Eye, Lost and Found collection. This picture  is one of the first ones of Miri taken soon after she was born . I can't wait to make layouts of all three together. Thanks for coming by and have a good day.

Tuesday, 13 March 2012

A brand new arrival

I know I've been a terrible blogger lately, but I've been up to my ears in working. First Purim and now Passover. But I have some gorgeous exciting news. DD1 has given birth to an adorable baby girl this morning, and here is the evidence

This is baby number 3 for DD. All girls. She is totally adorable and looks exactly like big sister 1 aka Tzivi. She weighed in at 2.9kilos which in English translates as 6 and 1/2 pounds. She's teeny tiny and gorgeous. She will be named at a naming ceremony in the synagogue on Saturday. That's all for now. Thanks for visiting